
Demarginalizing a Konkomba Folktale Introduction In the summer term of 2023, I participated in the seminar `Demarginalizing Orature’ – a class unlike any other I had taken before. Not only did I learn new aspects about African culture and acquired … Continue reading
Category Archives: Student Entries
You may enter your blog entry/ies here. Please walk your readers through the various stages of your work while simultaneously outlining the challenges you encountered, how you navigated those challenges, and any noteworthy coding and/or editorial decisions you made and why. 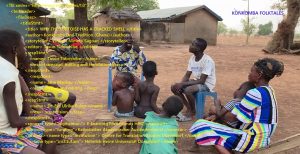
Working on ‘Why the Broom’s Neck is Tied’
Introduction Going into my first session of the Demarginalising Orature class I wasn’t really sure what to expect. I knew it was going to be something quite different from what I’d done before, and I was excited to learn something … Continue reading
Final Session (Summer Term 2023)
Reply
During our last session on July 13, 2023 each student group presented the final results of the projects we have done during the course of this semester. It was a great way of getting a better understanding of the individual folktales besides the ones we were working on ourselves. Together we took a look at the different video editing and coding experiences as well as talked about our individual difficulties during the process.
Coding
In the beginning of this semester most of the students, myself included, struggled with the coding part of this class. The most common mistakes were such as:
- forgetting to close the tags
- changing the geographic coordinates in the header
- Finding quotes in the text so it can be properly coded
- Finding all words for the notes and glossary
- not using the <q> tag
At least for me it was a foreign experience and way beyond my “academic comfort zone”. Nonetheless it was an experience that greatly benefitted me in the end.
Video Editing
This class wasn’t the first time I used video editing programs but I never worked with DaVinci Resolve before. Since I missed both tutorial sessions I had to figure the works out by myself but thankfully our instructors provided us with a detailed step by step guide. Nonetheless there were a few things that really proved difficult in the beginning:
- locking the subtitles and setting them at the right place (the timestamps were sometimes confusing)
- adding a title page without shifting any of the subtitle, audio or video tracks
- inserting the credits at the end
These were all things that most of the students struggled with and together we came up with helpful suggestions how to solve any of the before mentioned problems, e. g. the use of additional editing programs or to create the videos in multiple steps to avoid the shifting of the subtitles. In the end most of us felt confident in using DaVinci Resolve again with considerably less effort.
Results
At the end of our last session we talked about the class in general and gave feedback on our individual experiences and accomplishments. Personally I am really glad that I had the chance to participate since I gained a lot of new skills and insight into the Konkomba culture.
Presenting our Videos
In this week’s class we had our group presentations on the videos we had to edit and subtitle at home. We looked at what we have done so far and the problems we have had during the process of subtitling and the editing with the program Da Vinci Resolve.
The biggest problems that were mentioned had to do with the title, the timestamps and the software.
Also, as a community, we made some changes and discussed improvements to be made.
Issues:
Title -> One person only had an audio about the telling of the folktale and not a video. She had a black screen at first but then figured it out and used a lot of pictures matching the audio. She encountered problems when putting the title before the audio so the subtitles were already shown in the title.
We also used the English titles of the folktales rather than the original ones because we decided to use those in the class before.
Timestamps -> The timestamps are displayed in seconds and milliseconds and this made it difficult for some of us to convert them directly into Da Vinci Resolve since it happened that the video shifted in the program because of the title. That is why some had to listen to the presenting voices (even without understanding Likpakpaln) to fit the subtitles to the spoken. Others put the subtitles first and added the title afterwards but that also caused some videos to shift. Some timestamps also were not that accurate so people went with their gut and listened to some key words. Therefore the question arose if we should rather focus on the exact timestamps or the characters per second.
Software -> For some it was difficult getting used to the software. One person did not know how to cut the video in the end before the credits but she received help and fixed it. We also noticed that after we finished editing the video quality got worse, probably because of the adjusted frame rate.
One folktale had a song and the editor changed the subtitles to another color to make it more clear when they were singing. The storyteller was also speaking very fast so he had to put the number of the characters per second down and left no gaps between the subtitles.
Additional changes / information
Other things that were mentioned were those, that the presentation on video-editing and subtitling was very helpful when problems arose.
We also decided to add “Düsseldorf – HHU“ to the credits after the “Centre of Translation Studies“ to make them more accurate.
The pyramid form when subtitling is highly preferred.
The word Ulambidaan was no translated because there was no good English translation for it. It is a common noun in Likpakpaln and it describes a psychological or medical condition, similar to a hyperactive kid that also takes joy in teasing and making fun of other people.
The word Ubor was also not changed because it means chief or political leader of the people and is very known and common.
Often folktales are being told while other community activities are happening to keep them entertained, such as cracking shells manually. The folktale and video “The Monitor Lizard nearly floors the Hyena in a wrestling match“ is a good example for the occasion where folktales are performed.
Other than that, we were told that a few things were added to our codes for our final presentation next week where we will present everything we have done throughout the semester with the help of powerpoint presentations we are preparing.
On the Subtitling of Orature
As I was unable to join today’s session, I’m going to discuss the process of video editing and subtitling which we began last week instead on focusing on the topics discussed in class.
The small amount of video editing experience I had going into this project didn’t quite prepare me for just how finicky this ended up being. We were kindly provided with translated and timestamped subtitles for our respective videos, but the editing process was much more complex than just copy-pasting the text and numbers. There are some general rules that good subtitles need to abide by in order to fulfill their purpose. Ultimately, I needed to adjust most subtitles to a certain degree to meet those requirements.
An Arduous Process
The size and letter spacing of the subtitles is something that can easily be adjusted based on intuition alone, but the same cannot be said about the two main problems I encountered:
Firstly, the duration and pacing of the subtitles. One full second is generally considered to be the minimum, though this obviously only works for very short subtitles. In some cases, a storyteller may speak rather quickly, forcing the subtitles to proceed and change at a very fast rate, leading to a high amount of characters per second (CPS), which becomes hard to read. There was a section in one of the videos where I ultimately had to combine two separate subtitles into one because even just the small pause between them pushed the CPS beyond 30, which is much too fast for most people. Since subtitles are meant to promote accessibility, this obviously wouldn’t do.

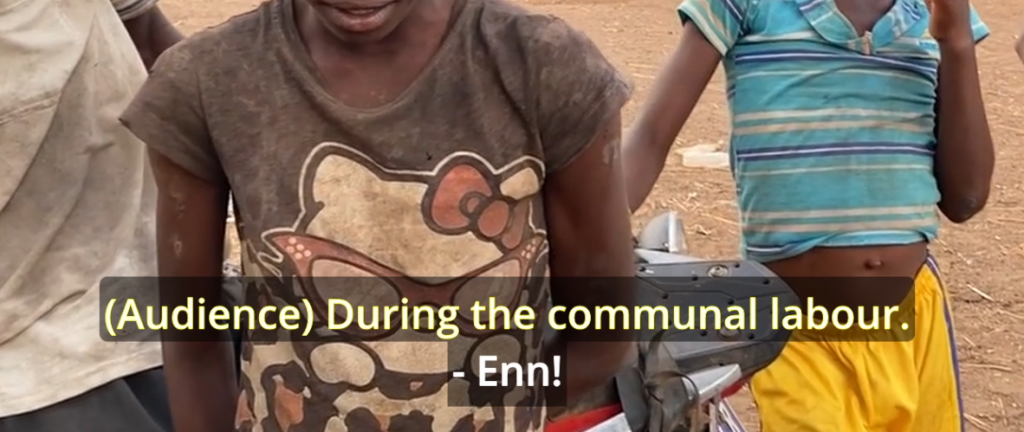
Secondly, dealing with multiple speakers. In one video, there is a second person who interjects into the story with a short comment and later joins the storyteller in song. The problem was that, aside from the song, both people didn’t really speak simultaneously, making a shared subtitle for both feel strange as it would either begin too early before the person in question started speaking, or linger too long, which also just felt slightly off. As a result, I split the subtitles for the storyteller and the audience member into two separate regions that could appear and disappear separately. I also colored them differently, so that it was easier to tell at a glance who was speaking.
In conclusion:
Orature like what we have been working with in this course is meant to be performed. Making those performances accessible and understandable to people who don’t speak the language of the storyteller is an essential part in the process of demarginalization.
Working on editing and subtitling these videos has given me a new appreciation for anyone who has ever provided high-quality subtitles for any kind of media. It’s time-consuming, but ultimately very important work, not just in the context of our course.
Presenting our Codes
This week we presented the codes we did for homework and talked about difficulties and problems. Some of the problems mentioned were: making sure that all the tags are closed, finding quotes in the text so it can be properly coded and the order in which the divisions need to be closed.
We also decided that we are going to use the English terms for the animals in the folktales in the titles, to make it more accessible for readers who don’t understand the Likpakpaln language. In the stories themselves the Likpakpaln words will still be used because we don’t only want to share the folktales but also the culture that they originate from.
Group Work I
During the session on May 25, 2023, the focus was on group work. Prior to this session, we were divided into groups and each group was assigned a different folktale to code. Before diving into the group work, Michael took some time to discuss common mistakes and areas for improvement in the codes.
An example of an improvement discussed during the session was to include an empty row at the start and end of a song. This can be represented by the XML tags <row><cell></cell></row>. Including this empty row helps to enhance the visual clarity and organization of the XML file, especially when it is converted into a PDF format.
Here is an example.
This is what it looks like when you include an empty row at the beginning of a song:
In contrast, this is what it looks like when you exclude the empty row:
The focus of this week’s session was on group work and highlighting the importance of small details that significantly enhance code readability and structure. By incorporating these relatively simple elements, we ensure that our final code is visually pleasing and organized.
How to Code: Songs, Footnotes and Glossary
This week we started the session going over some common mistakes and mishaps from our homework. After Anne and Michael pointed out the mistakes we got some time to correct our codes so we could move on to the next tasks with a perfect code.
Then we learned how to code a song. This is special because the songs are displayed in two columns: one for the Likpakpaln transcript and one for the English translation. In order to do that we need to create a table in the code. This is the code we were taught to use:
<div type= “song”>
<table type= “translation”>
<row role= “head”>
<cell><hi rend= “bold”>Likpakpaln transcription</hi></cell>
<cell><hi rend= “bold”>English translation</hi></cell>
</row>
<row></row>
<row> <cell><l>Maadim ee, bi koo’ pak Maadim ee too. (2x)</l></cell>
<cell><l>Maadim, all are full of praise for Maadim. (2x)</l></cell> </row>
</table>
</div>
In order for the lines of the song to be more legible we place an empty row between the lines.
We were also taught how to code footnotes and a glossary. Both codes work in a similar way where there needs to be a connection between the footnote or the word in the text and the corresponding number or explanation in the notes/glossary.
These are the examples we were given:
footnotes:
… <term xml:id=”footnote1″><hi rend=”superscript”>1</hi></term>
<div type=”Note”>
<head type=”subTitle”>Note</head>
<list type=”index”>
<label>1.</label><item><gloss target=”#footnote1″> explanation </gloss></item>
</list>
</div>
glossary:
<cell><l><term ref=”#gloss1″>Asantes</term> passed here</l></cell>
<div type=”glossary”>
<head type=”subTitle”>A Glossary of Likpakpaln Words</head>
<list type=”gloss”>
<label>Asantes:</label><item><gloss xml:id=”gloss1″>plural form of Asante.
The Asante people, who are commonly known as Ashanti people or Ashantis, are one of the ethnic groups in Ghana that make up the Akan group. They inhabit the southern part of Ghana, especially the Ashanti region.</gloss></item>
</list>
</div>
Finally, we were placed into groups of two for our group project.
Coding the Folktale: Errors
In our 4th session, May 4th, first we did a recap of the previous session, elaborating on the header, followed by a quick exercise finding possible errors in the examples
Then, we reviewed basic elements of coding:
- text divisions <division>
- title and subtitle <head>
- paragraphs <p>
quotes/spoken word
<q>
Then we focused on the header as an important part of codes.
A header includes Metadata and has the following mandatory elements:
<fileDesc>
<titleStmt></titleStmt>
<publicationStmt></publicationStmt>
<sourceDesc></sourceDesc>
</fileDesc>
Michael and Anne asked the class find all mistakes in the sample header, and nearly everyone detected 10 mistakes.
This is a part of one example of a sample header we discussed in the class:
<TEI xmlns=”http://www.tei-c.org/ns/1.0″
<teilleader>
<filedesc>
<titleStmt>
<title>Parents Should Love Their Children Equally</title
*The title is not closed properly-
Finally, the class was asked to continue coding the folktale “Parents Should Love their Children equally”.
Introduction to TEI and XML
In our second session (April 27th), we were introduced to TEI and XML. First, we learned that TEI is an acronym for Text Encoding Initiative, which is used to create data from scratch, store data and transform data in machine/computer-readable formats. The type of information stored is varied: not only texts but also audios, pictures, and videos can be stored in digital form. XML is an acronym for Extensive Markup Language, a descriptive computer language that uses symbols to create a clear structure in a text document. TEI and XML are essential tools because they allow information, in our case Konkomba folktales, to be easily accessible for those interested in the stored data while simultaneously preserving it so it will not be lost in the future.
Next, we were shown how a TEI file is structured. A TEI file always contains a header and a text also referred to as a body. There are also main containers and sub-containers (short: sc) which contain elements. Their purpose is to define the Markup Language. For example, when coding we use an Open Tag (<), then we insert the elements/sc, and then use a Close Tag (>). We have to keep in mind that Tags are a very integral part of Markup Language. Without Tags a TEI file cannot be properly formed, resulting in an error. At the beginning of every TEI file, we need to type <TEI…> before we begin with the header and the text/body. Only when we are completely finished with creating a TEI file, we can type </TEI>. This is the first step.
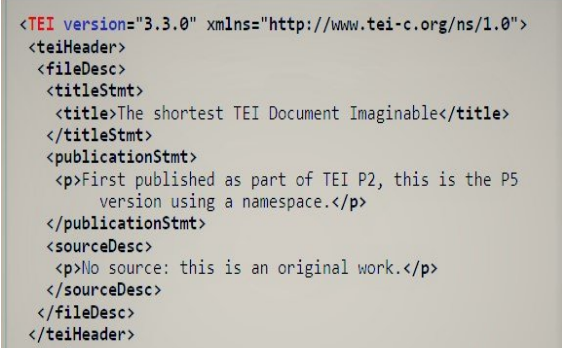
The second step is to create a header. The header needs to be tagged as <teiHeader>. There, the main container is situated. It contains metadata, like the author, storyteller, publication information, editors, sponsors, etc. This is mandatory information that is typed as follows: <fileDesc>… </file Desc> (file Description), <titleStmt>…</titleStmt> (title statement), <publicationStmt>…</publicationStmt> (publication statement), and <sourceDesc>…</sourceDesc (source description). When all the mandatory information is in the TEI file, we use </fileDesc>. There are also optional elements, like <encodingDesc> (encoding description) which details editorial decisions or the relationship between a text and the source from which it was derived. When the header is completed, we use </teiHeader>.
We were shown an example of how the header is structured:
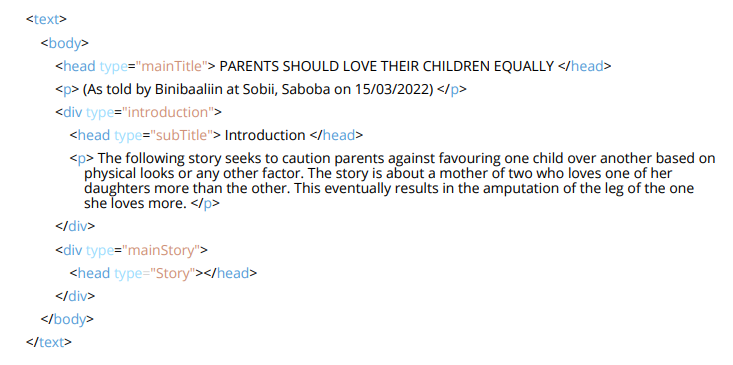
After that, the text is tagged as <text>. The text contains the body (tagged as <body>… </body>). First, we need to put the title or subtitle: This is done by putting <head>… </head>. To markup sections within a text, we need to use <div>… </div>. To create paragraphs, <p>…</p> is used. Finally, to encode line breaks or quotations we use <l>…</l> and <q>…</q>. When we are finished with the body, </body> needs to be put at the end. To finish the text section, we type </text>.
This was another example shown to us of how to successfully create a text/body section:
To conclude, I think the introductory lesson about TEI and XML has been easy to follow and was explained in a way that wasn’t too complicated. At first, I was a bit nervous about learning how to code because I don’t have a lot of experience with coding but after this session, I am interested to learn more about TEI and how we are going to implement coding in our future sessions of the seminar.