
In our second session (April 27th), we were introduced to TEI and XML. First, we learned that TEI is an acronym for Text Encoding Initiative, which is used to create data from scratch, store data and transform data in machine/computer-readable formats. The type of information stored is varied: not only texts but also audios, pictures, and videos can be stored in digital form. XML is an acronym for Extensive Markup Language, a descriptive computer language that uses symbols to create a clear structure in a text document. TEI and XML are essential tools because they allow information, in our case Konkomba folktales, to be easily accessible for those interested in the stored data while simultaneously preserving it so it will not be lost in the future.
Next, we were shown how a TEI file is structured. A TEI file always contains a header and a text also referred to as a body. There are also main containers and sub-containers (short: sc) which contain elements. Their purpose is to define the Markup Language. For example, when coding we use an Open Tag (<), then we insert the elements/sc, and then use a Close Tag (>). We have to keep in mind that Tags are a very integral part of Markup Language. Without Tags a TEI file cannot be properly formed, resulting in an error. At the beginning of every TEI file, we need to type <TEI…> before we begin with the header and the text/body. Only when we are completely finished with creating a TEI file, we can type </TEI>. This is the first step.
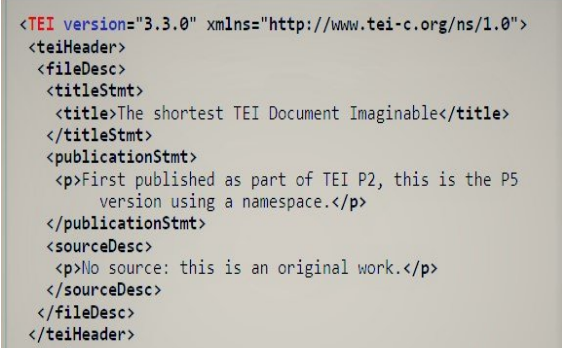
The second step is to create a header. The header needs to be tagged as <teiHeader>. There, the main container is situated. It contains metadata, like the author, storyteller, publication information, editors, sponsors, etc. This is mandatory information that is typed as follows: <fileDesc>… </file Desc> (file Description), <titleStmt>…</titleStmt> (title statement), <publicationStmt>…</publicationStmt> (publication statement), and <sourceDesc>…</sourceDesc (source description). When all the mandatory information is in the TEI file, we use </fileDesc>. There are also optional elements, like <encodingDesc> (encoding description) which details editorial decisions or the relationship between a text and the source from which it was derived. When the header is completed, we use </teiHeader>.
We were shown an example of how the header is structured:
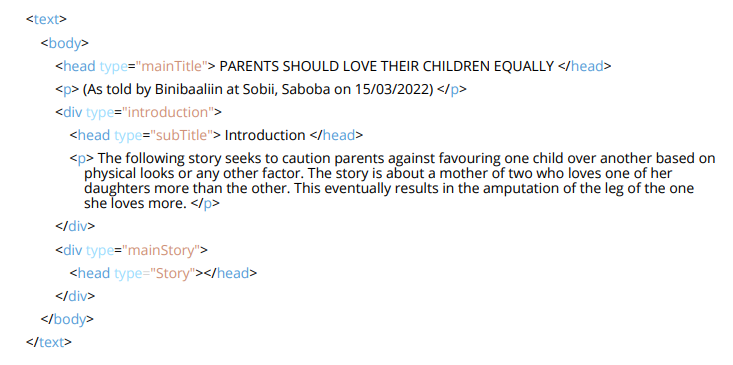
After that, the text is tagged as <text>. The text contains the body (tagged as <body>… </body>). First, we need to put the title or subtitle: This is done by putting <head>… </head>. To markup sections within a text, we need to use <div>… </div>. To create paragraphs, <p>…</p> is used. Finally, to encode line breaks or quotations we use <l>…</l> and <q>…</q>. When we are finished with the body, </body> needs to be put at the end. To finish the text section, we type </text>.
This was another example shown to us of how to successfully create a text/body section:
To conclude, I think the introductory lesson about TEI and XML has been easy to follow and was explained in a way that wasn’t too complicated. At first, I was a bit nervous about learning how to code because I don’t have a lot of experience with coding but after this session, I am interested to learn more about TEI and how we are going to implement coding in our future sessions of the seminar.
Thanks for sharing, Yara. I’m glad that you’re fired up for the subsequent sessions. The real fun is yet to begin!!?
Great blog entry, Yara! It is truly helpful to revise the basics.